Posted on Leave a comment

DIY Hair Masks for Damaged Hair: Revitalize, Repair, and Nourish Naturally

Having damaged hair can feel frustrating. Whether it’s from heat styling, chemical treatments, environmental stressors, or simple lack of care, damaged hair often looks lackluster, feels brittle, and may be prone to breakage. But before you throw in the towel and turn to expensive salon treatments or store-bought products full of chemicals, there’s a natural solution that’s often overlooked: DIY hair masks.

Homemade hair masks can be a game-changer when it comes to repairing and nourishing damaged hair, using simple ingredients that you likely already have in your kitchen or local health food store. These DIY masks work by targeting the underlying causes of damage—whether it’s dryness, protein loss, split ends, or a lack of shine—restoring health and vitality to your hair over time.

Why DIY Hair Masks?

Before we jump into specific recipes, it’s important to understand why DIY hair masks are such a fantastic option for treating damaged hair.

Customizable and Natural Ingredients
The beauty of DIY hair masks is that you can customize them to meet your hair’s exact needs. If your hair is particularly dry, you can add more moisturizing ingredients. If it’s brittle or weak, you can focus on adding protein-rich components. DIY masks also avoid the harsh chemicals, sulfates, and parabens found in many store-bought products.

Cost-Effective
Salon treatments and high-end hair masks can be expensive, but DIY options allow you to achieve similar results for a fraction of the price. Plus, most of the ingredients you need are household staples, making these masks budget-friendly.

No Harsh Chemicals
Commercial products often contain preservatives and synthetic fragrances that can further damage already weakened hair. By opting for DIY masks, you’ll nourish your hair without adding harmful substances.

Convenient and Fun
Making your own hair masks is easy, and it can be a fun, self-care experience. You don’t have to wait for a salon appointment—whip up a mask at home, relax for a while, and enjoy the process of pampering your hair.

Key Ingredients for Damaged Hair

There are several natural ingredients you can use in DIY hair masks to nourish, repair, and restore your hair. Below are some of the most effective ones.
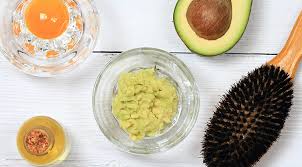
1. Avocado
Avocado is a powerhouse ingredient packed with essential fatty acids, vitamins, and minerals that provide deep hydration to dry, damaged hair. The healthy fats help to restore moisture, while the proteins in avocado can promote hair strength.

2. Coconut Oil
Coconut oil is known for its ability to penetrate deep into the hair shaft, locking in moisture and preventing further damage. Rich in antioxidants, vitamin E, and fatty acids, it’s perfect for both moisturizing and strengthening the hair.

3. Honey
Honey is a natural humectant, which means it draws moisture from the air into the hair. It helps soften and hydrate the hair while also providing shine. It’s also packed with antioxidants that support hair health.

4. Eggs
Eggs are rich in proteins and nutrients that help strengthen and repair damaged hair. The proteins in eggs can promote hair growth and help restore lost keratin. They also provide moisture to dry hair.

5. Olive Oil
Olive oil is a classic ingredient for moisturizing and nourishing hair. It helps smooth the hair cuticle, preventing frizz, and protects it from heat and environmental damage. Olive oil also has anti-inflammatory properties that can soothe the scalp.

6. Yogurt
Yogurt contains lactic acid, which helps remove dead skin cells and build-up from the scalp. It also nourishes the hair with proteins, vitamins, and probiotics that can promote stronger, shinier hair.

7. Aloe Vera
Aloe vera is renowned for its healing properties. It contains enzymes that help repair and rejuvenate the scalp and hair. Aloe also moisturizes the hair and helps soothe irritation, making it ideal for sensitive or damaged scalps.

8. Bananas
Bananas are rich in potassium, antioxidants, and vitamins that can help smooth the hair, reduce split ends, and restore its natural shine. They also promote elasticity and help reduce hair breakage.

9. Argan Oil
Argan oil is often called “liquid gold” because it’s packed with essential fatty acids, antioxidants, and vitamin E, making it an excellent option for repairing and nourishing damaged hair. It also helps control frizz and adds a beautiful shine.

DIY Hair Mask Recipes for Damaged Hair

1. Avocado and Honey Hair Mask
This hydrating mask is perfect for dry, brittle hair that’s in desperate need of moisture.
Ingredients:

1 ripe avocado
2 tbsp honey
1 tbsp olive oil

Instructions:

Mash the avocado in a bowl until smooth.
Add the honey and olive oil, and mix until well combined.
Apply the mixture to damp hair, focusing on the ends and areas of damage.
Cover with a shower cap and leave the mask on for 20-30 minutes.
Rinse thoroughly with lukewarm water and follow up with your usual conditioner.

2. Coconut Oil and Egg Hair Mask
This protein-packed mask helps repair damaged strands by restoring protein and moisture balance.

Ingredients:

2 tbsp coconut oil
1 egg
1 tbsp honey

Instructions:

Warm the coconut oil until it’s melted.
Beat the egg in a bowl, then mix in the melted coconut oil and honey.
Apply the mask to damp hair from root to tip.
Cover with a shower cap and leave for 30-40 minutes.
Rinse with cool water to avoid cooking the egg, and wash with shampoo.

3. Banana and Yogurt Repair Mask
This mask helps smooth, strengthen, and restore shine to damaged hair.

Ingredients:

1 ripe banana
2 tbsp yogurt
1 tbsp honey

Instructions:

Mash the banana until smooth.
Add the yogurt and honey and mix well.
Apply the mask to your hair, covering the entire length.
Let the mask sit for 20-30 minutes.
Rinse and shampoo as usual.

4. Olive Oil and Aloe Vera Hydration Mask
This mask is perfect for providing deep moisture and calming an irritated scalp.

Ingredients:

3 tbsp olive oil
2 tbsp aloe vera gel
1 tbsp honey

Instructions:

Combine the olive oil, aloe vera gel, and honey in a bowl.
Apply the mixture generously to your hair and scalp.
Cover your hair with a shower cap and leave it on for 30-45 minutes.
Rinse and wash your hair with your regular shampoo.

5. Egg and Argan Oil Strengthening Mask
This rich mask helps restore protein to weak and brittle hair.

Ingredients:

1 egg
2 tbsp argan oil
1 tbsp honey

Instructions:

Beat the egg in a bowl and add the argan oil and honey.
Mix until everything is well blended.
Apply the mask to your hair, focusing on the ends.
Let it sit for 20 minutes, then rinse thoroughly and shampoo.

Tips for Best Results with DIY Hair Masks

Consistency is Key: For the best results, try to incorporate a DIY hair mask into your routine once a week or at least every two weeks. This will give your hair the time it needs to heal and regain its natural strength.

Know Your Hair Type: If your hair is fine, you may want to use lighter masks with ingredients like aloe vera, yogurt, or honey. For thicker or coarser hair, you can go for richer masks with ingredients like coconut oil, avocado, or egg.

Be Patient: Natural ingredients take time to work, so don’t expect miracles after one treatment. Give your hair the time it needs to absorb all the goodness from these masks.

Damaged hair doesn’t have to be a permanent problem. With the right ingredients and a little time, DIY hair masks can transform your locks from dry, brittle strands to healthy, shiny tresses. Whether you’re dealing with heat damage, over-processing, or just the everyday wear and tear of life, there’s a mask for you. By using these natural ingredients, you’re not only treating your hair but also nourishing it with the nutrients it needs to look and feel its best.
So, start experimenting with these recipes, and enjoy the self-care process as you rejuvenate your hair. Over time, you’ll notice stronger, healthier, and more radiant hair that’s naturally beautiful.

Posted on Leave a comment

How to Blend Hair Extensions Seamlessly with Your Natural Hair

Hair extensions are an amazing way to enhance your hairstyle, giving you instant volume, length, and thickness. But, the magic behind a flawless extension look isn’t just about choosing the right set of extensions; it’s also about blending them seamlessly with your natural hair. Whether you’re looking to achieve a sleek, sophisticated look or add playful volume, blending your extensions well is the secret to making them look as natural as possible.

In this detailed guide, we will explore the essential steps and techniques to blend your hair extensions perfectly with your natural hair. Whether you’re new to extensions or a seasoned pro, this guide will offer valuable tips and tricks that will help you achieve a polished and realistic finish.

1. Understanding the Different Types of Hair Extensions

Before even considering how to blend your extensions, it’s crucial to understand the different types available on the market. Each type of extension has its unique method of application and, consequently, specific techniques for blending. Here are some of the most common types:
Clip-In Extensions: These extensions are perfect for anyone looking for a quick and temporary hair transformation. Clip-ins are inserted into your hair by snapping them into place with clips. They’re removable and easy to apply, making them ideal for events, photoshoots, or any occasion where you need extra length or volume for a short period.

Tape-In Extensions: These are semi-permanent extensions applied by taping the extension to a small section of natural hair. They are glued to the hair in a sandwich-like fashion, creating a smooth, seamless look. Tape-ins require professional installation, but they last for a few months, making them a great option for long-term wear.

Sew-In (Weave) Extensions: Sew-in extensions are applied by braiding natural hair and sewing the extensions into the braids using a needle and thread. This method is longer-lasting than clip-ins, and the hair can be styled more freely since the extensions are securely sewn in.

Fusion (Bonded) Extensions: These extensions are bonded to your natural hair using a keratin glue and heat fusion. Fusion extensions tend to be more permanent and are known for their ability to blend well with the natural hair, as the bonds are virtually undetectable.

Micro-Link Extensions: This method involves attaching small beads to sections of your natural hair and securing the extension with the bead. Micro-link extensions are easy to install and maintain, and they provide a very natural look with minimal damage to the hair.

2. Selecting the Right Shade of Extensions

Choosing the right shade of extensions is absolutely vital for achieving a seamless look. Extensions that contrast too much with your natural hair can create an obvious line of demarcation, breaking the illusion of natural hair. Here’s how to select the right shade for blending:

Single-Tone Hair: If your hair is one solid color, opt for extensions that match your natural shade exactly. It’s best to attach the mid-lengths and ends of your hair rather than the roots, as natural hair tends to have some variation in color.

Multidimensional Hair: If your natural hair has highlights, lowlights, or natural color variations, it’s important to choose extensions that replicate this multidimensional look. For example, if your hair has blonde highlights or a balayage effect, you should look for extensions that have a mix of shades to match that complexity.

Root Color: If you’re looking for extensions that will help you blend even more seamlessly, consider extensions that have a darker root and lighter ends (especially if you have a root-to-tip color gradient). This technique mimics the natural growth of hair and helps to avoid a noticeable line where the extensions start.

3. Preparing Your Natural Hair for Extensions

For your extensions to blend effectively with your natural hair, the prep work is just as important as the installation. Here’s how to properly prepare your hair:

Shampoo and Condition: Begin by thoroughly washing and conditioning your hair. Use a lightweight, sulfate-free shampoo to avoid stripping your hair of essential oils. Follow up with a nourishing conditioner to hydrate and soften your natural hair. If you have curly or textured hair, deep conditioning is also an excellent step.

Detangle: After your hair is clean and conditioned, use a wide-tooth comb or a detangling brush to remove any knots. Start at the ends and work your way up to avoid breakage. This step ensures that your hair will lay flat when the extensions are applied.

Dry Your Hair: It’s essential to dry your hair before installing extensions, especially if you are using clip-ins or tape-ins. You can either air-dry your hair or use a blow-dryer to ensure your hair is completely dry. For sleek styles, consider blow-drying with a round brush for volume and smoothness.

Heat Protection: If you plan on using heat styling tools, apply a heat protectant spray or serum. This will help protect your natural hair and extensions from heat damage, keeping them shiny and healthy.

Cut and Trim: To ensure your natural hair and extensions blend smoothly, get a trim before applying the extensions. Regular trims will prevent split ends and help maintain a fresh, healthy look.

4. Layering Your Natural Hair for Better Blend

Layering is crucial for seamless blending, especially if your natural hair is shorter or has different textures from the extensions. If you want a natural flow, layers will help the extensions blend without appearing bulky.

Add Layers: Whether you’re wearing clip-in extensions or tape-ins, layers help create a more natural appearance. If your natural hair is long and the extensions are significantly longer, layering will prevent the extensions from creating a “shelf” effect, where the hair appears uneven.

Consult a Stylist: If you’re unsure about how to layer your hair, consult a professional stylist. They can give you tips on how to blend your natural hair with extensions more naturally and even cut the extensions to match the shape of your face.

5. Installing the Extensions for a Seamless Look

Proper installation is key to making extensions look natural. The way you place the extensions in your hair will determine how seamless they appear. Let’s look at some installation methods for different types of extensions:

Clip-In Extensions: Clip-ins should be added in layers. Begin by sectioning your hair from the bottom to the top, securing each section with clips. Start clipping in the extensions from the nape of your neck, and work your way upwards. Make sure the clips are not visible, and be sure to place them under a layer of natural hair.

Tape-In Extensions: Tape-in extensions should be applied to the smallest sections of hair, and the bonds should be placed close to the scalp, ensuring the tape isn’t visible. Tape-ins can be tricky, and it’s recommended to get them done by a professional, as improper placement can cause the extensions to fall out or look uneven.

Sew-In Extensions: For sew-in extensions, the natural hair is braided into rows, and the extensions are sewn into the braids. Ensure the braids are tight but not too tight, as this can cause discomfort. Once sewn in, you can leave some natural hair at the top to cover the extensions.

Fusion or Micro-Link Extensions: These methods involve attaching individual strands of hair using small beads or keratin bonds. Micro-link extensions are applied strand by strand, which makes them look more natural and customizable, as each strand can be perfectly matched to the texture and color of your natural hair.

6. Blending the Extensions with Your Natural Hair

Now that the extensions are installed, the real magic happens during the blending process. To achieve a flawless, natural look, follow these techniques:

Use a Flat Iron or Curling Iron: One of the easiest ways to blend your extensions is to style your hair with the extensions. If your natural hair and extensions have slightly different textures, using a flat iron or curling iron can create a uniform texture. For straight looks, use a flat iron to smooth both the natural hair and extensions. If you’re going for waves or curls, use a curling iron to add volume and texture to both.

Teasing or Backcombing: Lightly tease the roots of your natural hair to create more volume and help the extensions blend into your hair seamlessly. Teasing also hides the wefts of clip-ins and creates a fuller appearance.

Use a Light Hairspray: Once your hair is styled, finish with a light mist of hairspray. Choose a flexible-hold hairspray that won’t leave your hair crunchy or stiff. The goal is to lock in the look while maintaining a soft, natural movement.

Blend with a Wide-Tooth Comb: To ensure there’s no visible line between your natural hair and the extensions, use a wide-tooth comb to gently blend the two. Avoid using fine-toothed combs, as they can cause tangles and make the extensions more noticeable.

7. Maintain Your Extensions for Long-Term Seamless Blending
Maintaining your extensions is essential for keeping them looking natural and blended with your hair. Proper care ensures they stay healthy and last as long as possible.
Regularly Wash Your Extensions: Extensions should be washed every 1-2 weeks to avoid product buildup. Use a sulfate-free shampoo, and apply a lightweight conditioner to keep the hair soft and manageable.

Brush Gently: Use a wide-tooth comb or a special extension brush to detangle the extensions. Brush your hair carefully to prevent any tangling, especially before bed or after washing.

Protect While Sleeping: To protect your extensions from tangling while sleeping, tie your hair in a loose braid or wear a silk/satin hair wrap or pillowcase. These materials help reduce friction and prevent hair breakage.

Avoid Heavy Products: While it’s tempting to load up on oils and creams to keep your hair hydrated, using too many heavy products can weigh down both natural hair and extensions. Stick to lightweight leave-in conditioners and serums.

Get Regular Touch-Ups: Depending on the type of extensions you have, it’s a good idea to schedule regular touch-ups or salon visits to maintain the seamless look. For tape-ins, sew-ins, or fusion extensions, regular maintenance will keep the extensions looking fresh.

Blending hair extensions with your natural hair takes time, practice, and attention to detail, but the results are worth it. By selecting the right type of extensions, preparing your natural hair properly, using the correct installation techniques, and maintaining your extensions, you’ll achieve a flawless, natural look every time. Whether you’re looking to enhance your hair for a special occasion or simply enjoy longer, fuller hair every day, blending your extensions perfectly will ensure that no one can tell where your natural hair ends and your extensions begin.

Posted on Leave a comment

How to Define Your Curls Using Mousse, Curling Cream, and Water

If you’ve been struggling to achieve well-defined, bouncy curls, you’re not alone. Many people battle frizz, lack of definition and dryness when styling their natural curls. The good news? With the right technique and products, you can bring your curls to life.

Mousse, curling cream and water are a powerful trio for achieving soft, well-defined curls with long-lasting hold. Water hydrates, curling cream enhances definition, and mousse locks everything in place without leaving your hair stiff. We’ll walk you through a step-by-step method to help you maximize curl definition while keeping your hair healthy and voluminous. Whether you have loose waves or tight coils, this routine can work wonders. Let’s dive in.

Step-by-Step Guide to Defining Your Curls

Step 1: Start with Clean, Damp Hair

•Wash your hair with a moisturizing shampoo and conditioner.
•Gently squeeze out excess water with a microfiber towel or cotton T-shirt, leaving your hair damp but not dripping wet.

Step 2: Section Your Hair
•Divide your hair into 4–6 sections using clips to make the process easier.

Step 3: Apply Water for Hydration
•If your hair has started drying, spray each section you’re working on with water to ensure it’s evenly damp. This helps with better product absorption.

Step 4: Apply Curling Cream for Definition
•Take a small amount of curling cream and rub it between your palms.
•Brush with a detangling brush to ensure the product is evenly spread
•Make sure to distribute evenly to avoid frizz.

Step 5: Apply Mousse for Hold
•Take a little amount of mousse(appropriate for the section you’re working with) and scrunch it into your curls, focusing on the ends and mid-lengths.
•Scrunch in an upward motion to encourage curl formation.

Step 6: Define Curls (Optional)
•For extra definition, use the finger-coiling method (twisting small sections around your finger) or a Denman brush to enhance your curl pattern.

Step 7: Air Dry or Diffuse
•Let your hair air dry for a natural look, or use a diffuser on low heat to speed up drying while keeping your curls intact.

Step 8: Scrunch Out the Crunch (If Needed)
•Once dry, scrunch your hair with weightless oil or hair lotion to break any stiffness from the mousse and soften your curls.

Achieving beautifully defined curls doesn’t have to be complicated. By using water to keep your hair hydrated, curling cream to enhance definition, and mousse for long-lasting hold, you can create a perfect curl routine tailored to your hair type. The key is to be consistent and patient—curls thrive with proper care and technique!
Remember, everyone’s hair is unique, so don’t be afraid to experiment with product amounts and methods to find what works best for you. Happy styling.

Posted on Leave a comment

Everything You Need to Know Before and After Relaxing Your Hair.

Relaxing your hair can be a transformative experience, giving you smoother, more manageable locks, but it requires thoughtful preparation and aftercare to ensure your hair remains healthy and vibrant. Whether you’re getting your first relaxer or maintaining relaxed hair, there are several essential steps to follow before and after the process. This in-depth guide will walk you through everything you need to know, from pre-relaxing precautions to the ultimate post-relaxing routine.

Before Relaxing Your Hair: Preparation Is Key

Relaxing your hair is not a decision to be taken lightly, and preparation is crucial to minimize damage and ensure the best results. Here’s what you need to do:

1. Assess Your Hair’s Health
Before relaxing your hair, it’s important to evaluate the current state of your strands. Relaxers work by chemically altering the structure of your hair, and if your hair is already damaged, this process could exacerbate the damage. Here’s how you can assess your hair health:

Check for Split Ends: If your ends are split, fragile, or breaking, it’s essential to trim them before relaxing. Relaxing weak hair can cause further breakage.

Strengthen Your Hair: If your hair feels brittle or dry, take a few weeks to nourish it with deep conditioning treatments. Look for protein-rich hair masks to rebuild strength and moisture balance.

Healthy Scalp: Ensure your scalp is in a healthy state. Conditions like dandruff, eczema, or irritation should be treated beforehand to avoid complications during the relaxing process.

2. Choose the Right Relaxer for Your Hair Type
Relaxers come in different strengths and formulations, so it’s vital to select one that suits your hair type:

Mild Relaxer: Best for fine or damaged hair. It won’t straighten the hair as intensely as stronger relaxers, but it can be more forgiving on delicate strands.

Regular Relaxer: Ideal for normal hair textures. This strength is commonly used for hair that isn’t too fine or too coarse.

Super Relaxer: A stronger formula meant for thick, coarse, or resistant hair.

When in doubt, consult with a professional stylist who can recommend the best relaxer based on your unique hair needs.

3. Perform a Strand Test
A strand test is a must to see how your hair will react to the relaxer. This involves applying a small amount of the relaxer to a discreet section of your hair to check for any adverse reactions or excessive damage. This test can help prevent over-processing and ensure your hair can handle the chemicals.

4. Protect Your Skin and Scalp
Relaxers contain harsh chemicals that can irritate the skin. Here’s what you should do to protect your skin and scalp:

Apply Petroleum Jelly or Oil: Generously apply petroleum jelly or a thick oil around your hairline, ears, and neck to prevent the relaxer from touching your skin.

Protective Cap or Towel: Consider wearing a protective cap or towel around your shoulders to prevent any drips or accidental relaxer spillage.

5. Choose a Professional Stylist
If you’re not experienced with relaxing your own hair, it’s highly recommended to go to a professional stylist who knows how to apply relaxers safely. A professional will ensure that the relaxer is applied evenly and that the processing time is not exceeded, which can cause damage.

During Relaxing: The Process

1. Section Your Hair
Divide your hair into small sections to allow the relaxer to be applied evenly. Work in manageable sections, making sure the relaxer is spread from root to tip.

2. Timing is Everything
The timing for how long you leave the relaxer in your hair depends on the strength of the product and your hair type. Over-processing can lead to severe damage, so it’s essential to follow the instructions carefully. A professional stylist will monitor the time closely to avoid over-relaxing.

3. Rinse Thoroughly
Once the processing time is complete, rinse the relaxer out with lukewarm water, making sure to remove all traces of the product. This is a crucial step to prevent further chemical reactions.

4. Neutralize
Most relaxers come with a neutralizing shampoo designed to stop the chemical process. Make sure to use this shampoo as instructed to balance your hair’s pH and prevent hair damage.

After Relaxing Your Hair: Maintenance and Care

Once your hair is relaxed, it’s crucial to follow a meticulous aftercare routine to preserve your new look and protect your hair from breakage and dryness.

1. Deep Condition Immediately
After relaxing, your hair will be in need of moisture and nourishment. Apply a deep conditioning treatment right after rinsing out the relaxer to restore moisture and elasticity. You can use store-bought deep conditioners or opt for a DIY treatment using oils such as coconut, jojoba, or avocado oil.

2. Limit Heat Styling
While it’s tempting to use hot tools to style your relaxed hair, try to limit the use of heat immediately after relaxing. Your hair will be more susceptible to heat damage, so give your strands a break from blow dryers, flat irons, and curling irons. If you must use heat, always apply a heat protectant.

3. Moisturize Regularly
Relaxed hair tends to be drier than natural hair, so moisturizing is critical. Look for a leave-in conditioner or a moisturizing cream that suits your hair type. Make sure to apply it to damp hair and seal in the moisture with a light oil. You may also want to try oil treatments or hot oil treatments once a week.

4. Trim Regularly
Relaxed hair requires frequent trimming to avoid split ends and breakage. The chemicals in the relaxer can weaken hair, so trimming every 6-8 weeks will keep your hair healthy, even, and free from damage.

5. Be Gentle When Detangling
Relaxed hair is more fragile than natural hair, so be extra careful when detangling. Use a wide-tooth comb or your fingers to gently remove knots and tangles. Work in sections and always detangle from the tips upward to prevent breakage.

6. Protect Your Hair at Night
To keep your relaxed hair smooth and reduce frizz, it’s essential to protect it while sleeping. You can:
Wear a Satin or Silk Scarf: This prevents your hair from rubbing against rough cotton pillowcases, which can cause breakage and dryness.
Use a Satin or Silk Pillowcase: If you don’t like wearing a scarf, consider investing in a satin or silk pillowcase, which is gentle on your hair and helps retain moisture.

7. Avoid Chemical Overload
After relaxing your hair, avoid using harsh chemical treatments like perms, hair dyes, or other relaxers for at least 6-8 weeks. Your hair needs time to recover from the chemical process.

8. Protect Your Hair from the Elements
Sun, wind, and cold weather can all cause damage to your relaxed hair. When going out in the sun, protect your hair with a hat, or apply a UV-protectant spray to shield it from the harsh rays. Similarly, during winter, ensure your hair is moisturized and covered to avoid dryness and brittleness.

9. Stay Consistent with Your Routine
To maintain the health of your relaxed hair, consistency is key. Stick to a regular hair care routine that includes deep conditioning, moisturizing, trimming, and gentle detangling. Over time, this will keep your hair strong and looking great.

Things to Avoid After Relaxing Your Hair

1. Don’t Wash Too Often
Washing your hair too frequently can strip it of its natural oils, leaving it dry and prone to breakage. Aim to wash your hair no more than once a week, or every 10 days, depending on your hair’s needs.

2. Avoid Over-Processing
If you are relaxing your hair more than once a year, you risk over-processing. Stick to relaxing every 8-12 weeks to ensure your hair doesn’t become overly weak or damaged.

3. Don’t Neglect Your Scalp
While it’s easy to focus on hair length and texture, the scalp is just as important. Keep your scalp clean and healthy, but avoid harsh scrubbing or scratching, which can irritate the skin.

Relaxing your hair can be a rewarding way to achieve sleek, smooth strands, but it requires proper preparation and consistent care to maintain its health and beauty. By following these essential steps before and after relaxing your hair, you can ensure that your relaxed tresses remain vibrant, strong, and manageable for the long haul. With the right routine, your hair will continue to thrive and look gorgeous with every pass of the relaxer.

Posted on Leave a comment

How to care for Human hair Mermaid braids

1.Detangle Gently

Comb Before Washing: Use a wide-tooth comb or your fingers to gently remove any tangles. Start from the ends and work your way upward.

Then use a denman brush to make sure the human hair bundles part is properly detangled.

2.Washing

Use lukewarm water and a moisturising sulphate-free shampoo.

Shampoo twice and rinse it out properly to ensure no residue remains.

3.Condition the Wig

Apply a moisturising conditioner evenly, concentrating on the bundles part of the braids.

Let It Sit: Allow the conditioner to sit for about 3–5 minutes.

Rinse Again: Thoroughly rinse with cool water until the conditioner is completely removed.

4. Dry the Wig

Gently Remove Excess Water: Press the braids and hair between two clean towels to absorb water. Do not twist or wring.

5.Apply a few drops of hair serum for moisture and brush with a denman brush

6.Air Dry or Blow dry on medium-low heat

Optional

Style: Once dry, you can gently comb through or style your mermaid braids as desired.

Posted on Leave a comment

Curly, Kinky, or Coily: Understanding Your Natural Hair Type

When it comes to natural hair, one of the most important aspects of hair care is understanding your specific hair type. Natural hair comes in many textures, ranging from loose curls to tight coils, and each type requires a different approach to care. Understanding whether your hair is curly, kinky, or coily is essential for developing a personalized hair care routine that keeps it healthy, beautiful, and manageable. This guide will explore the differences between these hair types, how to identify your own, and how to care for each type to achieve its best potential.

The Science of Hair Texture

Hair texture is primarily determined by the shape of your hair follicle. People with round follicles typically have straight hair, while those with oval or asymmetrical follicles tend to have curly or coily hair. The tighter the curl or coil, the more oval or irregular the follicle tends to be. This also affects how the hair grows, how it reacts to products, and the amount of moisture it can retain.

In general, there are three main categories of natural hair textures:

Curly Hair
Kinky Hair
Coily Hair

Within each category, there can be a variety of sub-textures, ranging from loose waves to tight, defined curls or coils.

Curly Hair: Defined Loops and Bouncy Curls

Curly hair is often described as having defined loops or ringlets. The curls are generally more uniform, with each strand forming a circular or spiral shape. Curly hair can be thick, fine, or medium in texture, but it tends to have a natural bounce that makes it more voluminous and dynamic.

Characteristics of Curly Hair:

Shape: Loose, well-defined S-shaped curls.

Pattern: Curls are uniform in size and pattern.

Porosity: Curly hair tends to be medium-porosity, meaning it can absorb and retain moisture fairly well, but might also be prone to frizz in humid environments.

Shrinkage: Curly hair experiences moderate shrinkage as the curls draw up when wet or after washing.

Manageability: Curly hair can be both easy and challenging to manage. While the texture tends to be soft, it can be prone to frizz and needs to be moisturized regularly.

Care Tips for Curly Hair:

Shampooing: Use a sulfate-free shampoo to prevent stripping your curls of their natural oils. Consider co-washing (conditioner-only washing) if your hair is on the drier side.

Conditioning: Deep conditioning is essential for keeping curly hair hydrated. Choose a rich, moisturizing conditioner to ensure curls stay defined and soft.

Styling: Use a leave-in conditioner or curl cream to define and enhance curls. Consider finger-coiling for more defined curls or using a diffuser to dry your hair without disturbing the curl pattern.

Kinky Hair: Thick, Z-shaped Curls

Kinky hair, also known as “type 4” hair, is often the most misunderstood and underrepresented natural texture. It is characterized by tightly coiled or zig-zag-shaped strands that can range from soft, fine hair to coarse, dense hair. Kinky hair can look very different depending on how tightly the coils are wound, but it is generally much tighter than curly hair.

Characteristics of Kinky Hair:

Shape: Z-shaped, tightly coiled or zig-zag pattern.

Pattern: Each strand may appear to grow in a tight spiral, making it difficult to see the individual curl at first glance.

Porosity: Kinky hair tends to be dry because it has difficulty retaining moisture due to the tightness of the coils. It is usually low-porosity, meaning it takes longer to absorb moisture.

Shrinkage: Kinky hair experiences significant shrinkage—up to 75%—as the coils tighten when wet.

Manageability: Kinky hair is typically very dense and can be coarse, making it both more resilient and more prone to breakage if not properly cared for. However, with the right products and techniques, kinky hair can be incredibly versatile and beautiful.

Care Tips for Kinky Hair:

Shampooing: Use a sulfate-free shampoo to prevent moisture loss. It’s also helpful to clarify once a month to remove product buildup.

Conditioning: Regular deep conditioning treatments are essential for maintaining moisture in kinky hair. Look for heavy creams or oils that provide intense hydration.

Moisturizing: Kinky hair thrives on moisture. Use a daily leave-in conditioner or hair oil (such as castor oil or argan oil) to seal in moisture and prevent dryness.

Styling: Protective styles like twists, braids, or buns are great for minimizing breakage and retaining length. Consider doing the “LOC” method (liquid, oil, cream) to keep your hair hydrated and defined.

Coily Hair: Tight, Springy Curls

Coily hair, which can often be confused with kinky hair, is a tighter, more defined texture with curls that resemble springs or corkscrews. This hair type is often found in people with African heritage, though it can appear in various ethnic groups. Coily hair can be both fine and coarse, but it is generally more delicate than kinky hair due to the tightness of the curl.

Characteristics of Coily Hair:

Shape: Tight corkscrews, spiral curls, or zig-zag patterns.

Pattern: Curls are usually tighter and more defined, with less volume than curly or kinky hair.

Porosity: Coily hair is usually low-porosity, meaning it requires more effort to hydrate and retain moisture.

Shrinkage: Coily hair experiences significant shrinkage, often compressing up to 75% of its actual length.

Manageability: Coily hair is delicate and can be prone to breakage, but when properly moisturized, it can have an incredibly healthy and bouncy appearance.

Care Tips for Coily Hair:

Shampooing: Like other natural hair types, coily hair should be washed with a sulfate-free shampoo. Avoid shampooing too frequently, as it can dry out the hair.

Conditioning: Coily hair loves moisture, so using a rich, hydrating conditioner and deep conditioner is key. Look for products that help define curls without weighing them down.
Moisturizing: To maintain moisture, apply hydrating creams, oils, or butters. Products like shea butter, jojoba oil, and coconut oil work well for coily hair.

Styling: To maintain curl definition, coily hair can benefit from styling creams, curl gels, and other products designed to keep the coils from losing their shape. For the healthiest results, avoid excessive heat styling and opt for air-drying, twist-outs, or flexi-rod sets.

How to Determine Your Hair Type

Understanding your natural hair type can be tricky, especially since hair can fall into multiple categories or change over time due to various factors (like product usage or environmental conditions). However, knowing the general shape of your curl pattern is the first step. To identify your hair type, consider the following:
Observe the Curl Pattern: Wet your hair, and notice how it behaves. Is it loose and bouncy (curly), tight and springy (coily), or zig-zagged (kinky)?
Analyze Your Hair’s Texture: Is your hair fine or coarse? Fine hair may look different when curled than coarse hair.
Shrinkage: Measure how much your hair shrinks when wet. Coily and kinky hair tends to shrink more than curly hair.
It’s also helpful to take a strand test: Take a small section of hair and stretch it. The tighter the curl, the more likely it is to fall under coily or kinky.

Understanding your hair type—whether curly, kinky, or coily—gives you the tools to build a hair care routine that enhances the natural beauty of your hair. Each texture comes with its unique needs, but with the right products and care techniques, all textures can thrive and flourish. The key is moisture, regular maintenance, and learning to love your natural texture. Whether you’re rocking bouncy curls, springy coils, or beautiful zig-zags, embrace your hair’s uniqueness, and remember: natural hair is beautiful in all its forms.

Posted on Leave a comment

How Often Should You Wash Your Wig?

Wigs have become an essential part of many people’s lives, offering versatility, convenience, and an opportunity to experiment with different styles. Whether you’re wearing wigs for medical reasons, fashion, or simply as a way to change up your look, proper maintenance is key to keeping your wig looking fresh and feeling comfortable.

One of the most common questions that wig wearers ask is: How often should you wash your wig? While this may seem like a simple question, the answer depends on a number of factors, including the type of wig, how frequently it’s worn, and the materials it’s made from. In this extensive guide, we’ll explore the different aspects of wig care, how to maintain your wig’s appearance, and how often you should wash it to keep it in top condition.

Understanding Different Types of Wigs

Before diving into how often you should wash your wig, it’s important to know what type of wig you have. Wigs come in two main categories: synthetic wigs and human hair wigs, and the care for each differs. Additionally, within these categories, there are different subtypes, including lace front wigs, full wigs, and more.

1. Synthetic Wigs
Synthetic wigs are made from man-made fibers, such as polyester or acrylic. These wigs are popular because they are often more affordable than human hair wigs and come pre-styled. They retain their shape even after washing, making them a low-maintenance option. However, because they are made from synthetic fibers, they can be more prone to tangling, heat damage, and wear over time.

2. Human Hair Wigs
As the name suggests, human hair wigs are made from real human hair. These wigs tend to look and feel more natural, can be styled with heat tools, and typically last longer than synthetic wigs. However, they require more maintenance and care, including frequent washing to keep them looking their best.

Factors to Consider When Deciding How Often to Wash Your Wig

The frequency with which you wash your wig depends on several factors. These include the type of wig, how often you wear it, your lifestyle, and the environmental conditions in which the wig is worn.

1. How Often Do You Wear Your Wig?
If you wear your wig daily or for extended periods, you may need to wash it more frequently than if you wear it only occasionally. The natural oils from your scalp, dirt, sweat, and other environmental factors can build up on your wig, especially if you wear it all day.

If you wear your wig frequently, aim to wash it every 7 to 10 wears. However, if you wear it occasionally or for special events, you can go much longer between washes, perhaps up to once a month, depending on how much buildup accumulates.

2. Are You Exposed to Sweat, Dirt, or Products?
If you’re in a humid environment, working out, or using styling products such as hairspray or gel, you’ll need to wash your wig more often to remove product buildup and any dirt or oils that accumulate. On the other hand, if you wear your wig in a more controlled environment, such as indoors with little sweat or product use, you can extend the time between washes.

3. The Type of Wig and Hair Material
The material your wig is made from directly influences how often you should wash it.
Synthetic Wigs: These don’t require frequent washing since they don’t accumulate natural oils or sweat in the same way human hair does. As a general rule, synthetic wigs should be washed after 6 to 8 wears. Over-washing can damage the fibers, leading to a loss of their shape or texture.

Human Hair Wigs: These wigs require more frequent washing compared to synthetic wigs. Ideally, human hair wigs should be washed after every 7 to 10 wears. If you wear it every day, washing it once a week is a good idea. However, if you’re using a lot of products or styling tools, consider washing it more often.

4. Climate and Environment
Your surroundings also play a major role in how frequently you should wash your wig. For example, if you live in a humid area or a place where pollution levels are high, your wig may get dirty or greasy more quickly. Similarly, if you frequently wear wigs in smoky or dusty environments, they will require more attention.

Signs That Your Wig Needs a Wash

Even though there’s no hard-and-fast rule about when to wash a wig, there are clear signs to look for when it’s time for a wash. Here are some indications that your wig could use a good cleaning:
Greasy or Oily Texture: If your wig starts to feel greasy or oily, it’s time for a wash. This usually happens with human hair wigs that accumulate natural oils from your scalp, or synthetic wigs that are exposed to sweat.

Tangles and Matting: If your wig starts to tangle or mat, it could be because of dirt, product buildup, or exposure to humidity. Washing the wig gently can help remove these tangles.

Funky Odor: A musty or unpleasant smell from your wig can be a sign of sweat, dirt, or product buildup. Washing your wig can help eliminate odors.

Loss of Luster: Over time, wigs can lose their shine, making them look dull. Regular washing, conditioning, and proper care can restore some of the original luster.

How to Wash Your Wig Properly

Washing a wig is a delicate process, especially when considering that improper washing can shorten its lifespan. Whether you have a synthetic or human hair wig, here’s a step-by-step guide on how to wash your wig:

1. Detangle the Wig
Before washing, gently detangle your wig with a wide-tooth comb or your fingers. This prevents knots and tangling during the wash process. Be extra careful when detangling synthetic wigs to avoid damaging the fibers.

2. Prepare the Wash Basin
For human hair wigs, fill a basin with lukewarm water and add a gentle shampoo. For synthetic wigs, use a specific synthetic wig shampoo. Avoid using regular shampoos as they can be too harsh for wigs.

3. Wash the Wig
Submerge the wig in the water, gently swishing it around to cleanse the fibers. Do not rub or twist the wig, as this can damage the fibers. For synthetic wigs, simply rinse with cold water, as hot water can damage the fibers.

4. Condition the Wig
Conditioning your wig, especially human hair wigs, is essential for maintaining softness and manageability. Apply a small amount of conditioner to the wig, focusing on the ends. Allow the conditioner to sit for a few minutes before rinsing it out.

5. Dry the Wig
After washing, gently pat the wig with a towel to remove excess water. Never wring the wig. For human hair wigs, allow them to air dry on a wig stand or mannequin head. Synthetic wigs should also be air-dried, as heat can damage the fibers. Avoid using hair dryers or other heat styling tools unless the wig is specifically designed for heat styling.

6. Styling
Once dry, gently comb and style the wig as desired. For synthetic wigs, avoid heat styling tools unless the wig is labeled as “heat-friendly.”

Tips for Maintaining Your Wig Between Washes

Washing a wig too frequently can wear it down, especially for synthetic wigs. Here are some tips to keep your wig fresh in between washes:

Use a Wig Cap: Wearing a wig cap under your wig helps absorb sweat and oils, preventing them from reaching the wig.

Dry Shampoo: A good dry shampoo can freshen up your wig and absorb oils without having to wash it.
Storage: Always store your wig properly when you’re not wearing it. A wig stand or mannequin head helps maintain its shape.

Avoid Over-Styling: Refrain from using heat or excessive styling products on your wig unless absolutely necessary.

So, how often should you wash your wig? The answer depends on your lifestyle, the type of wig, and how often you wear it. Synthetic wigs typically require less frequent washing than human hair wigs. As a general rule, wash your wig every 7-10 wears, or when you notice buildup, tangling, or an odor. With the right care and maintenance, your wig will stay looking fresh, natural, and ready to wear for longer.

Whether you’re sporting a sleek synthetic style or a luscious human hair wig, proper washing and care are essential to keep your wig looking as beautiful as the day you bought it. Make sure to follow the care instructions specific to your wig type and enjoy your new look for as long as possible.

Posted on Leave a comment

The Ultimate Guide to Protecting Your Wigs While Traveling.

Traveling is one of life’s greatest joys. Whether you’re jet-setting for business, embarking on a family vacation, or simply exploring a new city, the experience is always exciting. However, for those who wear wigs, traveling can also be a source of anxiety. The potential for damage to your wig while navigating airports, packing for a trip, and dealing with changes in climate or humidity is something many wig-wearers worry about. After all, a well-maintained wig is not just a style statement; it’s also a part of your identity, providing comfort, confidence, and a sense of normalcy.

But fear not, With the right precautions, you can keep your wig in tip-top shape while on the move. In this detailed guide, we will walk you through everything you need to know about protecting your wig while traveling, from pre-trip preparations and packing tips to maintenance on the go. Whether you wear a human hair wig, a synthetic wig, or a blended style, these tips will ensure that your wig stays in perfect condition no matter where you go.

Why Protecting Your Wig While Traveling is Essential

First, let’s understand why it’s so important to take care of your wig during travel. Your wig faces several potential threats during a trip:

Physical Damage from Packing and Handling: Luggage being tossed around, squished, or mishandled can cause your wig to lose its shape, resulting in tangling, frizzing, or even breakage. Wigs that are not properly stored can become misshapen, making them harder to style when you reach your destination.

Environmental Factors: Wigs are vulnerable to changes in temperature, humidity, and air quality. For example, air conditioning in an airplane or hotel room can dry out wig fibers, while excessive humidity can cause synthetic fibers to swell or lose their texture. Extreme temperatures can also alter the wig’s shape or texture, particularly if it’s made of synthetic materials.

Tangling and Frizzing: Longer wigs or curly styles can become tangled or frizzy during travel, especially if they are packed without enough protection. Improper storage leads to hours spent untangling your wig instead of enjoying your trip.

Risk of Exposure to Dirt, Moisture, or Sunlight: When wigs are stored incorrectly, they may come into contact with dirt or moisture, which can lead to permanent damage. The sun’s rays can also cause color fading over time, especially in human hair wigs.

Now that we understand the risks, let’s look at the comprehensive steps you can take to protect your wig during your travels.

1. Preparing Your Wig Before You Travel
Preparation is key. Taking the right steps before you pack your wig can ensure it stays in the best possible condition during your trip.

Wash and Condition Your Wig
If you’ve been wearing your wig for a while and it’s due for a wash, take the time to cleanse it thoroughly before your trip. This will prevent any product buildup or dirt from transferring to your clothes or luggage.

Human Hair Wigs: Use a gentle sulfate-free shampoo and conditioner designed for human hair wigs. Make sure the conditioner is hydrating to keep the wig’s strands soft and manageable. Afterward, allow the wig to air dry completely on a wig stand or mannequin head. Never wring it out or use excessive heat, as this can damage the fibers.

Synthetic Wigs: Synthetic wigs are typically not as high-maintenance as human hair wigs but still require gentle care. Use a special synthetic wig shampoo and conditioner, as regular hair care products could degrade the synthetic fibers. Rinse with cold water and air-dry the wig in its natural shape to avoid any deformation.

Detangle Your Wig
Before you travel, take the time to detangle your wig thoroughly. Use a wide-tooth comb or your fingers to carefully work through any knots. Be gentle, especially with curly wigs or long hair, as pulling too hard can cause damage to the fibers. This will also reduce the chances of your wig becoming a tangled mess during travel.

Trim and Style Your Wig
If your wig has grown long or is due for a trim, consider doing so before your trip. It’s much easier to manage a wig that is freshly trimmed, and it’ll save you time and hassle while traveling. You can also re-style your wig if you wish, ensuring it’s in its best shape for your trip. This way, when you reach your destination, you won’t need to spend too much time adjusting or restyling it.

2. Packing Your Wig: The Key to Safe Travel
Once your wig is prepped and styled, it’s time to pack it. Proper storage is critical to ensuring your wig arrives at your destination in one piece. There are several packing options to consider, depending on your travel method and the type of wig you have.

Use a Wig Stand or Mannequin Head
One of the best ways to keep your wig in good shape during travel is by storing it on a wig stand or mannequin head. This method ensures that the wig maintains its shape and prevents it from becoming squished or misshapen. Many travel-friendly mannequin heads are collapsible, making them easy to pack in a suitcase or carry-on bag. Additionally, storing your wig on a stand will allow for air circulation, preventing it from becoming damp or moldy due to moisture buildup.

Invest in a Wig Storage Box
For extra protection, consider investing in a dedicated wig storage box. These boxes are specifically designed to keep wigs safe during travel, providing a structured space that helps prevent the wig from being crushed. Look for a box that is sturdy and has enough room to house the wig without it being too tight, which could cause it to lose its shape. Some boxes even come with dividers to prevent tangling.

Use a Wig Cap and Mesh Net
Another excellent solution is to use a wig cap and mesh net. These simple tools will help hold your wig in place while you travel and prevent it from tangling or becoming frizzy. Wig caps are especially useful when traveling by air, as they help keep your wig snug and secure while minimizing movement inside your suitcase or bag.

Zippered Bag or Travel Pouch
If you’re traveling light or don’t have room for a wig stand or storage box, a zippered travel bag or pouch is an effective alternative. You can use a small ziplock bag or invest in a purpose-made wig travel pouch. Just be sure to carefully place your wig inside without squeezing it, and avoid cramming it with other items that might damage it. Keep the wig in a cool, dry location inside your luggage to prevent it from getting exposed to moisture or extreme temperatures.

3. Traveling with Your Wig: On the Road, Air, and Sea
The type of travel you’re undertaking will influence how you store and protect your wig during your journey. Here are tips tailored to different modes of transportation:

Air Travel
Carry-On Luggage: Always carry your wig in your carry-on bag, rather than checked luggage. The overhead bins in airplanes often do not provide enough protection for your wig. The constant jostling of checked luggage can also cause your wig to get crushed, tangled, or damaged.

Air Conditioning and Humidity: Airplanes are often very dry, with air conditioning that can strip moisture from both your skin and hair. A wig that’s too dry can become frizzy and difficult to manage. Consider using a lightweight mist or a protective wig spray that provides hydration and helps lock in moisture.

Avoid Overhead Pressure: If you plan to stow your wig in the overhead bin, ensure that it’s placed in a soft-sided bag or box to protect it from any heavy items that may be placed on top.

Road Trips and Train Travel

Storing the Wig: When traveling by car or train, keep your wig in a safe, secure place. If you’re driving, consider placing your wig on the passenger seat, where it will be free from pressure. If you’re using a suitcase, opt for a padded or structured one to avoid the wig being crushed.

Climate Changes: Road trips can take you through a variety of weather conditions, so it’s essential to be prepared for changes in temperature and humidity. A protective bag that allows some air circulation is ideal to prevent moisture from building up.

Cruises and Beach Destinations

Humidity Awareness: Cruise ships and beach destinations tend to have high humidity levels. For synthetic wigs, humidity can cause the fibers to swell or lose their shape, so it’s especially important to store them in a cool, dry place. Use a dehumidifier in your hotel room or a protective travel bag that seals the wig from excessive moisture.

Saltwater and Chlorine: If you’re heading to the beach, avoid letting your wig come into direct contact with saltwater or chlorine, as these can damage both human and synthetic hair. If your wig gets wet, rinse it with fresh water and let it dry naturally, avoiding the use of direct heat.

4. Maintaining Your Wig While Traveling
While you’re on your trip, there are a few things you can do to ensure your wig stays in top condition:

Keep the Wig Hydrated
Synthetic wigs can become dry and stiff over time, especially in dry climates or after prolonged exposure to the elements. Lightly spritz your wig with a wig-specific leave-in conditioner or spray designed to hydrate the fibers. Be sure to do this sparingly, as too much product can weigh the wig down.

Avoid Excessive Heat and Sunlight
Even if your wig is made of human hair, avoid exposing it to prolonged sunlight or heat, which can cause the fibers to dry out, fade, or lose their shape. Wear a hat or scarf to protect your wig from the sun, or store it in a shaded area when not in use.

Gentle Detangling
While traveling, your wig may need occasional detangling, especially if it’s long or curly. Be gentle when detangling, using a wide-tooth comb or your fingers to avoid causing breakage. Always start from the tips of the hair and work your way up to the roots.

5. Re-Styling and Touching Up After Your Trip
Once you’ve reached your destination, you may find that your wig needs a little touch-up. Whether the humidity or pressure from traveling has affected its look, here’s how to refresh your wig:

Human Hair Wigs: You can wash and restyle human hair wigs just like your own hair. Use a flat iron or curling wand to restore your desired look. Just be sure to use heat protectant sprays to avoid further damage.

Synthetic Wigs: Synthetic wigs often don’t respond well to heat styling. Instead, you can use a fabric steamer to gently reshape the wig or steam out any creases that may have formed during travel. If your wig is severely flattened, it may require a professional restyle.

Traveling with wigs doesn’t have to be a daunting experience. By taking the right steps to prepare, pack, and maintain your wig while on the move, you can ensure that your wig stays in pristine condition no matter where your travels take you. From careful packing and storage to addressing environmental factors and offering gentle maintenance on the go, these tips will help you protect your wig and preserve your look throughout your journey. With a little extra care, you can enjoy your travels without worrying about your wig! Safe travels, and may your wig always be fabulous.

Posted on Leave a comment

How and When to Use Serum vs Liquid Spray Heat Protectors

In today’s world of hair styling, heat tools like flat irons, curling irons, blow dryers, and straighteners have become almost essential in the routine of many people. Whether you’re aiming for sleek, straight locks, defined curls, or a bouncy blowout, these tools help achieve the desired look. However, consistent use of heat can take a toll on your hair. Heat styling tools can strip the hair of moisture, cause breakage, and leave it looking dull and lifeless. This is where heat protectors come in.

Heat protectants are hair care products designed to create a protective barrier between your hair and the high temperatures produced by styling tools. They act as a shield, preventing the heat from causing damage to your hair. Among the most commonly used heat protectants are serum-based formulas and liquid sprays. These two types of protectors each offer unique benefits, and knowing when and how to use them can significantly improve the health and appearance of your hair.

This blog will delve deep into serum and liquid spray heat protectors, discussing their unique properties, when to use each one, how to apply them, and their benefits for different hair types. We’ll explore the crucial aspects of heat protection so you can make informed choices and protect your hair from unnecessary damage.

What Are Heat Protectants and Why Are They Important?

What Are Heat Protectants?

Heat protectants are specially formulated products designed to minimize the damage caused by the high temperatures of styling tools. They create a protective barrier over the hair, which helps to prevent moisture loss, reduce hair breakage, and preserve the overall integrity of the hair shaft. While heat protectants can be found in various forms, they typically come in two primary types: serums and liquid sprays.

Serum heat protectants are typically thicker, oil-based formulas that coat the hair more heavily.

Liquid spray heat protectants are usually lighter, water-based products that distribute evenly with a fine mist.

Both forms of protectants work by lowering the temperature of the hair shaft to prevent thermal damage while styling. Heat protectants also help in preserving hair color, keeping hair hydrated, and reducing frizz or flyaways.

Why Heat Protectants Are Crucial for Hair Care

The importance of heat protectants cannot be overstated. Using them regularly can help ensure your hair stays healthy despite frequent exposure to heat. Here are some of the main reasons heat protectants are vital:

Prevention of Heat Damage: The most obvious reason to use a heat protectant is to prevent heat damage. When heat is applied to your hair, it can strip moisture and cause the cuticle (the outer layer of the hair) to open, leading to dry, brittle hair that is prone to breakage. A heat protectant helps to preserve the moisture in your hair, keeping it hydrated and protected.

Maintaining Hair Color: Heat can also cause color-treated hair to fade prematurely. By using a heat protectant, you create a barrier that shields the color molecules in the hair from being damaged by the high heat, helping your color last longer.

Improved Texture and Smoothness: Heat can cause hair to become frizzy, rough, and difficult to manage. Heat protectants, especially those with smoothing ingredients like silicones or oils, help to seal the cuticle, making hair smoother and more manageable. This also adds shine and a polished appearance to your finished style.

Reduced Frizz and Flyaways: One of the side effects of heat styling is frizz. Heat disrupts the natural moisture balance in the hair, causing it to swell and create frizz. Heat protectants often contain ingredients that prevent this swelling, keeping the hair smooth and frizz-free for longer periods.

Enhanced Styling Results: Heat protectants can also improve the overall outcome of your styling. They make the hair more pliable, ensuring that styles like curls, waves, or straightened looks hold better and last longer. They also provide a smooth base for styling, making tools glide through the hair without tugging or pulling.

Serum Heat Protectors vs. Liquid Spray Heat Protectors

Heat Protectant Serums

Heat protectant serums are typically thicker, oil-based products designed to coat the hair thoroughly. They provide a more intense layer of protection, especially for those with coarse or dry hair. These serums are often infused with nourishing oils such as argan oil, jojoba oil, or silicones, which help to smooth the hair, lock in moisture, and add a layer of protection.

When to Use a Heat Protectant Serum

For Thick, Coarse, or Curly Hair: Serums are particularly beneficial for individuals with thick, coarse, or curly hair, as these hair types tend to be more porous and prone to damage. Serums provide a heavier coating that helps to lock in moisture, tame frizz, and provide extra protection against high heat.

For Frizz Control: If you struggle with frizz, a serum will be your best friend. Serums help smooth down the cuticle layer of your hair, preventing it from puffing up and creating frizz. They also help to add shine, giving your hair a sleek and polished appearance.

For High-Heat Styling: When using styling tools that reach high temperatures, such as flat irons or curling irons set to 400°F or higher, a serum can offer superior protection. The thicker consistency of serums helps them form a more substantial barrier against the heat, preventing moisture loss and damage.

For Added Shine and Smoothness: If you want your hair to shine and look healthy, serums are often the go-to product. Many serums contain ingredients like silicones that reflect light, giving your hair a glossy, smooth finish. They also help prevent the hair from appearing dull or lackluster after styling.

For Deep Nourishment: Many heat protectant serums are enriched with nourishing oils and vitamins that help repair and maintain hair health. If your hair is dry or damaged, a serum will not only protect it from heat but also provide added hydration and nourishment.

How to Use a Serum Heat Protector

Apply to Damp Hair: For the best results, apply a serum to damp, towel-dried hair. This allows the serum to coat the hair evenly before you apply any heat.

Use a Small Amount: Start with a small amount of product (usually a pea-sized amount is sufficient for medium-length hair). If you have longer or thicker hair, you may need a bit more.

Distribute Evenly: Rub the serum between your palms and gently run your hands through your hair, focusing on the mid-lengths to the ends. Avoid the roots to prevent your hair from looking greasy.

Comb Through: Use a wide-tooth comb to ensure the product is evenly distributed and to detangle any knots.

Style as Usual: Once your hair is prepped, proceed with styling using your heat tools. You’ll notice that your hair will be smoother, shinier, and more protected from damage.

Heat Protectant Liquid Sprays

Liquid spray heat protectants are lighter, more fluid formulas that often come in spray bottles for easy application. These sprays are typically water-based and can contain alcohol or other ingredients that allow them to dry quickly without leaving a greasy residue. Liquid sprays offer lighter protection compared to serums but can still provide effective heat defense.

When to Use a Heat Protectant Liquid Spray

For Fine or Thin Hair: If you have fine or thin hair, a liquid spray is often the better option. It provides heat protection without weighing the hair down. The light mist ensures that your hair won’t lose its natural volume and movement.

For Quick Application: Liquid sprays are ideal for people in a hurry or who prefer a fast and easy way to protect their hair. The spray distributes evenly, so you don’t have to worry about using your hands or working it through your hair manually.

For Moderate Heat Styling: If you’re styling your hair at lower temperatures or using tools like blow dryers on a medium heat setting, a liquid spray can provide sufficient protection without the added weight of a serum. It’s great for light or everyday styling that doesn’t involve high heat.

For Natural or Beachy Looks: If you’re aiming for a natural, undone style, a liquid spray is perfect. It won’t weigh down your hair or interfere with its texture. Liquid sprays are great for keeping curls or waves bouncy and soft without making them look stiff or heavy.

For Oily or Greasy Hair: If you struggle with oily or greasy hair, a liquid spray is usually the better option. Unlike serums, sprays won’t add any extra weight or oil to your hair. They offer protection without making your hair feel greasy or weighed down.

How to Use a Liquid Spray Heat Protector

Spray on Damp or Dry Hair: Liquid sprays can be used on damp hair before blow-drying or on dry hair before using a curling iron or flat iron. It’s best to spray the product evenly on your hair to ensure consistent coverage.

Spray from a Distance: Hold the bottle about 6-8 inches away from your hair and mist it evenly. This ensures that the spray is distributed across a large surface area without saturating any one section of hair.

Comb or Brush Through: After spraying, use a comb or brush to distribute the product evenly throughout your hair. This step helps ensure that every strand gets protected.

Proceed with Styling: Once your hair is adequately coated, go ahead with styling your hair using your desired heat tools.

How to Choose Between Serum and Liquid Spray

Selecting the right heat protectant for your hair largely depends on your hair type, the styling tools you use, and your desired results. Here’s a quick breakdown of when to choose serum vs. liquid spray:

Choose Serum if: You have thick, coarse, or curly hair, need extra hydration, want added frizz control, or are styling with high-heat tools.

Choose Liquid Spray if: You have fine or thin hair, want lightweight protection, need a quick application, or are styling with moderate heat.

Choosing the right heat protectant is key to preserving the health of your hair while still achieving the styles you love. Whether you choose a serum or a liquid spray will depend on your hair type, styling routine, and desired level of protection. Both serums and sprays have their unique benefits, and understanding when and how to use them will ensure your hair stays protected from heat damage and remains shiny, smooth, and healthy for longer.

So, the next time you reach for your curling iron or blow dryer, don’t forget to grab your heat protectant, your hair will thank you for it.

Posted on Leave a comment

How to Prevent Static in Synthetic Wigs.

Wigs are a popular and versatile solution for many people, offering the ability to change your look without making permanent changes to your natural hair. Whether you’re sporting a synthetic wig for fashion, convenience, or medical reasons, it’s crucial to care for it properly to ensure it always looks its best. However, one of the most common problems synthetic wig owners face is static electricity. Static can leave your wig looking frizzy, messy, and downright unmanageable, especially in cold or dry weather conditions.

In this extensive guide, we will walk you through everything you need to know to prevent static buildup in synthetic wigs and maintain your wig’s sleek, smooth, and natural appearance over the long term. By following these tips and tricks, you can enjoy your synthetic wig without the hassle of unwanted frizz or flyaways.

Understanding the Science of Static Electricity in Synthetic Wigs

Before diving into the solutions, it’s important to first understand why static electricity affects synthetic wigs. Static buildup occurs when there’s an imbalance of electric charges between two objects, which results in them either attracting or repelling each other.

Synthetic wigs are typically made from fibers such as polyester, acrylic, or nylon. These materials are designed to resemble natural hair but do not have the same moisture content as human hair. The absence of natural oils in synthetic fibers makes them more prone to drying out, which can make static problems worse. Additionally, the fine synthetic fibers often rub against each other or the wearer’s clothing, generating an electrostatic charge that causes the fibers to repel one another. This results in the annoying flyaways and frizzy texture that so many wig wearers experience.

Environmental factors play a significant role as well. Dry weather, especially during winter months when indoor heating is in full use, strips the air of moisture. This, in turn, creates a more favorable environment for static electricity to build up, exacerbating the issue. Now that we know what causes static, let’s explore how to effectively prevent it.

1. Proper Conditioning Is Key

Just like your natural hair, synthetic wigs need to be kept moisturized to maintain their softness and prevent static. While synthetic fibers don’t benefit from natural oils, they can still be hydrated with the right products. Proper conditioning is one of the most essential steps in ensuring your wig stays smooth and static-free.

Using Synthetic-Specific Conditioners

Avoid using traditional hair conditioners, as they can weigh down the synthetic fibers, causing the wig to look greasy or limp. Instead, opt for conditioners specifically formulated for synthetic wigs. These conditioners typically come in spray or leave-in formulations and are designed to hydrate the fibers without making them sticky.

Apply a light mist of synthetic wig conditioner evenly across the hair, focusing more on the ends, which tend to get drier. Be careful not to oversaturate the wig, as too much conditioner can result in a greasy appearance or attract dust and dirt. Conditioning your wig every time you wash it will not only reduce static but also help the fibers maintain their natural luster and manageability.

2. Anti-Static Sprays Are Your Best Friend

One of the most direct and effective ways to combat static in synthetic wigs is to use anti-static products designed for wigs. Anti-static sprays work by neutralizing the electrical charges that cause the fibers to repel each other. These products are quick and easy to use and can have an immediate effect on frizz and flyaways.

How to Use Anti-Static Spray

Anti-static sprays for wigs are usually applied in light, even layers. Hold the bottle about 6-8 inches away from the wig and mist the spray lightly over the entire surface. Make sure not to oversaturate the fibers, as this can make the wig feel damp or heavy. Once applied, comb through the wig gently with a wide-tooth comb to distribute the spray and ensure an even coverage.

Some wig wearers prefer to use an anti-static brush in addition to or instead of the spray. These brushes are designed with conductive bristles that help dissipate static buildup as you brush through the wig. An anti-static brush can also smooth down any flyaways, making your wig look sleeker and more natural.

Choose the Right Product

When selecting an anti-static product for synthetic wigs, be sure to choose one that’s specifically made for synthetic fibers. Some regular anti-static sprays or household products may contain ingredients that could damage the wig or reduce its lifespan.

3. Avoid Excessive Heat and Styling

Many synthetic wigs are heat-resistant to some extent, but they are not immune to damage from excessive heat. While human hair can be styled with hot tools like flat irons, curling irons, and blow dryers, synthetic fibers can melt or become misshapen if exposed to too much heat. The damage caused by heat styling can leave the fibers more prone to static, especially if the wig becomes dry or brittle.

Stick to Low Heat or No Heat

If you must use heat on your synthetic wig, always ensure the tools are set to a low temperature. Most synthetic wigs are heat-resistant up to around 300°F (150°C), so it’s crucial to use tools that operate at lower temperatures. For example, some synthetic wigs can be styled with curling irons or flat irons set to a very low temperature to create soft waves or curls, but extreme heat should be avoided at all costs.

If you prefer a more gentle styling method, consider using non-heat styling techniques such as Velcro rollers or braid-setting the wig overnight to achieve natural waves. These methods are less likely to damage the wig and will keep it free from static caused by heat exposure.

4. Keep Your Wig Moisturized

If you want to prevent static in your synthetic wig, you must address dryness. Dry synthetic fibers are more likely to become static-prone. While conditioners provide hydration, sometimes a wig-specific moisturizing spray or serum can help maintain optimal moisture levels, preventing the fibers from becoming too dry and brittle.

Moisturizing Sprays and Serums

There are various moisturizing sprays and serums designed specifically for synthetic wigs. These products work by sealing moisture into the fibers, which helps keep them smooth and shiny. When applying these products, focus on the ends of the wig, as they tend to be drier than the roots.

Be careful to choose a lightweight formula, as heavy oils or serums can weigh the wig down and make it look greasy. Also, use these products sparingly—just a light mist should be enough to keep the wig hydrated and static-free.

For a more natural approach, you can mix a small amount of leave-in conditioner with water in a spray bottle, creating a DIY moisturizing spray. This can also help restore some shine to the wig while preventing static.

5. Gentle Brushing and Combing Techniques

The way you comb or brush your synthetic wig can also play a significant role in controlling static. Using the right tools and brushing techniques can help prevent tangling and minimize the friction that leads to static buildup.

Wide-Tooth Comb vs. Fine-Tooth Comb

Always use a wide-tooth comb or a wig-specific brush when detangling your synthetic wig. A fine-tooth comb can cause the fibers to snap, break, or become frizzy, which increases the likelihood of static. On the other hand, a wide-tooth comb works gently through the hair, reducing friction and minimizing static buildup.

Combing should always be done from the tips of the hair and gradually work your way up toward the roots. Be patient, and never pull or tug on the fibers, as this can cause breakage and disrupt the wig’s shape.

Anti-Static Brushes

Anti-static brushes are another excellent tool for keeping your synthetic wig smooth. These brushes are designed with bristles that help dissipate static as you brush. By regularly brushing your wig, you can reduce flyaways and keep the fibers tangle-free, ensuring the wig looks natural and static-free throughout the day.

6. Proper Storage and Maintenance

Proper storage of your synthetic wig is crucial in preventing static and preserving its overall condition. Storing your wig improperly—whether by throwing it in a drawer or leaving it exposed to harsh environmental conditions—can lead to static, tangling, and wear.

Use a Wig Stand or Mannequin Head

When you’re not wearing your wig, always store it on a wig stand or a mannequin head. This helps the fibers retain their shape, reduces friction, and prevents tangling. It’s also a great way to keep the wig from accumulating dust and static from being folded or crushed.

If you need to store the wig in a drawer or box, use a breathable wig bag or storage container to protect the fibers. Avoid using plastic bags, as they can trap moisture and lead to the fibers becoming damp and static-prone.

Maintain Humidity Levels

If you live in an area with low humidity or experience cold, dry winters, consider using a humidifier in your home. Dry air exacerbates static buildup, so maintaining an optimal level of humidity can make a significant difference in keeping your wig static-free.

7. Consider the Quality of the Synthetic Fiber

The quality of the synthetic fiber plays a huge role in how prone a wig will be to static buildup. Higher-end synthetic wigs, such as those made from Kanekalon or Toyokalon fibers, tend to be more resistant to static and frizz. These fibers not only look more natural but also have a smoother texture that helps prevent tangling and static accumulation.

If you’re finding that static is a constant problem with your synthetic wig, it may be worth investing in a higher-quality piece. A good quality wig will last longer, require less maintenance, and perform better when it comes to static control.

Static in synthetic wigs can be a frustrating problem, but with the right care, it’s completely manageable. By moisturizing your wig, using anti-static products, avoiding excessive heat, and brushing with the proper tools, you can maintain a smooth, frizz-free look. Proper storage and maintenance also play a significant role in preventing static, ensuring that your wig stays in great condition for years to come.

Remember that wigs, like natural hair, require attention and proper care. With the tips provided in this guide, you can combat static and enjoy a polished, natural-looking wig that enhances your appearance without the stress of frizz or flyaways.

0